
Blog
Curing Turkey Dryness
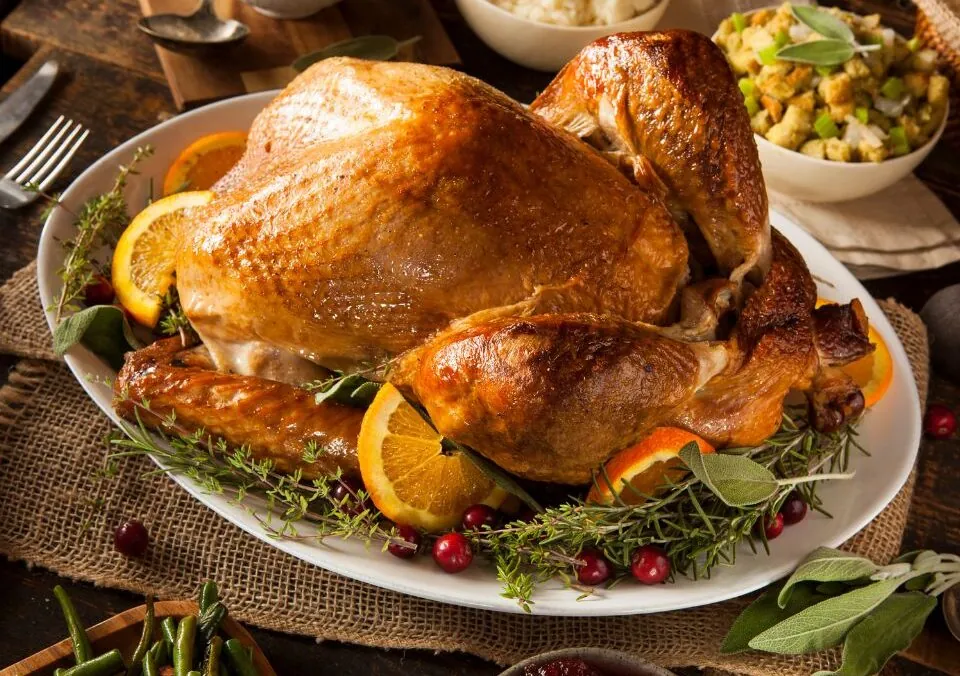
When you think of Thanksgiving dinner, the image of a perfectly golden-brown turkey often comes to mind. However, all too often, this centerpiece of the meal can end up being dry and unappetizing. While many home cooks rely on injecting their turkeys with butter to infuse moisture, there’s a more effective and flavorful method that my mom discovered: brining. Let’s dive deep into the art and science of brining a turkey, exploring why it works, how to do it, and tips for ensuring your Thanksgiving turkey is the best it can be.
Understanding the Science of Brining
Before we get into the specifics of our brining recipe, let’s understand how brining helps prevent turkey dryness. Brining works on a principle called osmosis. When a turkey is soaked in a saltwater solution, not only does it absorb moisture, but the salt also helps to denature proteins in the meat. This process allows the turkey to retain more moisture during the cooking process, resulting in a juicier and more flavorful bird.
According to a study published in the Journal of Food Science, brining meat enhances its juiciness and tenderness. By soaking the turkey in a brine, we reduce the likelihood of it drying out in the oven. This method is particularly important for turkey, which tends to be leaner than other meats.
The Perfect Buttermilk Salt Brine Recipe
Brining a turkey doesn’t have to be complicated, but you do want to ensure that you flavor the brine to your liking. The following recipe is a basic guide to a buttermilk salt brine, which adds a lovely tangy flavor to your turkey.
Ingredients:
- 1-2 half-gallon jugs of buttermilk, depending on the size of your turkey.
- 3-6 tablespoons of kosher salt (to taste).
- Water (enough to cover the turkey).
- Seasonings (e.g., pepper, garlic powder, thyme, rosemary – whatever you’d normally add to your turkey).
Steps for Brining:
- Choose Your Container: Find a container that is large enough to hold your turkey and the brine. You can use a large stock pot, a clean cooler, or a specific brining bucket.
- Mix the Brine: In the chosen container, combine the buttermilk, kosher salt, and any other seasonings you desire. Stir until the salt is fully dissolved.
- Prepare the Turkey: If your turkey is frozen, make sure to thaw it completely. Remove any giblets or innards from the cavity.
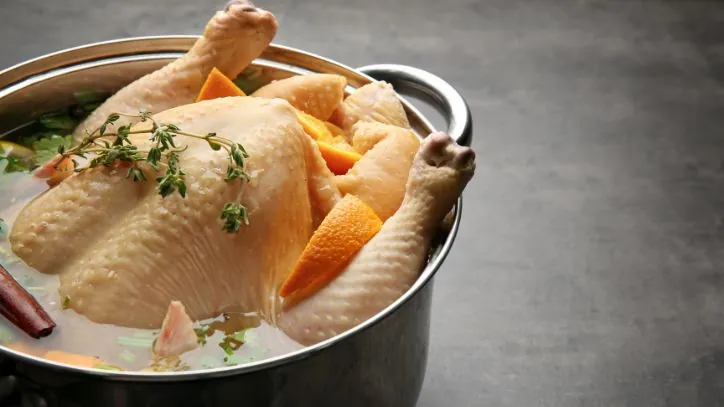
- Brine the Turkey: Submerge the turkey in the brine solution. If necessary, add water to ensure the turkey is fully covered.
- Let it Soak: Cover the container and place it in the refrigerator for 12-24 hours. If you are worried about space, a brining bag can be quite effective.
- Prepare for Cooking: After the brining time is complete, remove the turkey from the brine. Rinse the bird under cold water to remove excess salt, then pat it dry with paper towels.
- Season and Roast: Sprinkle and pat more of the seasoning onto the skin of the turkey for extra flavor. When you’re ready, place your turkey in a roasting bag and set it on a baking sheet before putting it in the oven.
Benefits of Buttermilk in Brining
Using buttermilk in your brine provides several advantages. First, the acidity in buttermilk helps to tenderize the meat, making it even more succulent. Additionally, buttermilk adds a distinct richness and flavor that enhances the overall taste of the turkey. In fact, many renowned chefs swear by buttermilk marinades for meat.
A source from the USDA explains that buttermilk is also a great source of calcium, which can contribute to overall tenderness during cooking.
Additional Brining Tips
Now that you’ve got your basic recipe and an understanding of how brining works, here are some additional tips and tricks to ensure your turkey turns out fabulous:
- Consider Flavor Customizations: Feel free to experiment with various herbs and spices. Traditional choices include sage, thyme, and black pepper, but feel free to get creative. Garlic, orange zest, or even apple cider can add delicious layers of flavor.
- Adjust Salt to Your Preference: The amount of salt you use can vary depending on your taste and the size of your turkey. Taste the brine before submerging your turkey and adjust the salt levels to suit your palate.
- Avoid Over-Brining: If your turkey stays in the brine too long, it may become overly salty. A good rule of thumb is to brine no longer than 24 hours.
- Don’t Skip the Drying Step: After removing the turkey from the brine, drying it thoroughly is crucial. This ensures that the skin gets crispy during roasting.
- Use a Meat Thermometer: Investing in a quality meat thermometer is essential for cooking your turkey perfectly. Aim for an internal temperature of 165°F (74°C) when measured in the thickest part of the breast.
What to Do After Brining
Once your turkey is brined and ready to roast, make sure you take the time to prepare it correctly. After patting the turkey dry, here are further steps to ensure a successful cook:
- Choose Your Cooking Method: You can roast your turkey in the oven, smoke it, or even fry it. Each method has its pros and cons regarding flavor and texture.
- Roasting: If you decide to roast your turkey, preheat your oven to 325°F (165°C). For the best crispiness, consider roasting your turkey uncovered for at least part of the cooking time.
- Basting: Some people swear by basting their turkeys, while others feel it isn’t necessary. If you choose to baste, do so every 30-45 minutes (lifting the lid of the oven releases heat).
- Let it Rest: Once your turkey is done cooking, let it rest for about 20-30 minutes before carving. This resting period allows the juices to redistribute throughout the meat, ensuring a moist turkey.

Troubleshooting Common Issues
Despite our best efforts, things may not always go as planned. Here are some troubleshooting tips for common turkey-related issues:
- Dry Turkey: If your turkey turns out dry, it might have been overcooked or not brined long enough. Make a note for the next time to check your cooking time diligently.
- Underseasoned Turkey: If you find your turkey lacking in flavor, consider seasoning it more heavily before roasting. A good brining method should include salt, but feel free to add more spices.
- Rubbery Skin: If your turkey’s skin turns out rubbery, it may not have been dried properly before cooking. Ensuring the skin is dry can help achieve that beautiful crispiness.
Conclusion
Curing turkey dryness with the right brining technique can transform your Thanksgiving dinner from average to extraordinary. With my mom’s buttermilk salt brine recipe, you’ll be well on your way to serving a juicy, flavorful turkey that even the pickiest eaters won’t be able to resist.
Make sure to share your brining experiences, experiments, and tips with family and friends, especially on those festive gatherings. And remember, the heart of the holiday meal is spent around the table, enjoying not only the delicious food but also the company of loved ones.
For more holiday articles or recipes, check out the Fill Your Plate blog! Happy cooking and enjoy your Thanksgiving celebrations!
Recommended Further Reading
- The Science of Brining Meat – A detailed article exploring the science behind brining.
- USDA Food Safety Information – Guidelines on safe food handling practices, especially regarding poultry.
- Epicurious: How to Brine a Turkey – A comprehensive guide with tips and videos on brining.
With these resources, you’ll be equipped to not only brine your turkey perfectly but also understand the nuances of flavor and moisture that make a Thanksgiving feast truly memorable. Enjoy!
By Heide Kennedy, Arizona Farm Bureau Communications Intern


Featured Recipes
COTTAGE CHEESE & BLUEBERRY BREAKFAST BAKE
Read More

Warm Your Soul Lasagna Soup
Read More
Pear Lime Jello Salad
Read More