Blog
Mini Pear Pies: A New Fall Favorite
By Lisa Kaschmitter, recent Arizona State University Nutrition Student
Fall is just around the corner and for those of us in love with this time of year, we’re already gathering our favorite recipes with plans to cook. A fall favorite of my entire family has always been pumpkin pie. We look forward to it all year, so this fall the possible pumpkin shortage has been the topic of conversation more than once around the dinner table. This possible shortage stems from Illinois where nearly ninety percent of the pumpkins in the U.S. are grown. Illinois has experienced heavy rains this year that have wiped out and delayed pumpkin crop growth throughout the state. This means that canned pumpkin at the grocery store may be in short supply this season.
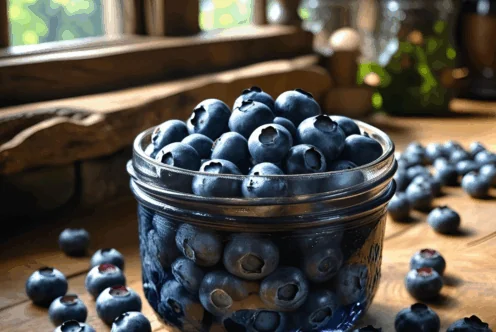
Although it is hard to beat pumpkin pie for my family, we decided that this year we would be prepared to try something new. There is a long list of pie worthy fillings that are in season during the fall: sweet potatoes, apples, pears, and figs are all great choices. Personally pears are one of my favorite healthy fall flavors, and one medium pear boasts 6 grams of fiber, 206 mg of potassium, vitamin B6, magnesium, and vitamin C.
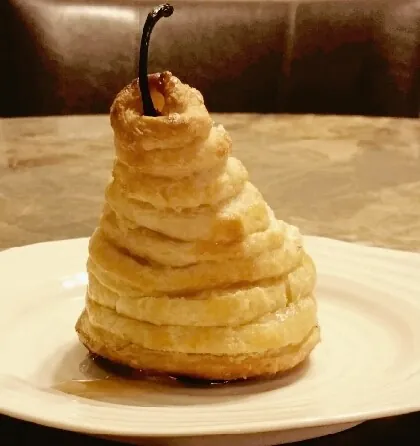
I recently discovered a recipe for mini pear pies, from Paul Hollywood that was featured on The Great British Bake Off. These pies are so beautifully unique looking that I couldn’t wait to try my hand at making them. I combined Paul’s recipe for poached pears and syrup, while utilizing a recipe for puff pastry by Winnie Abramson that I had used in the past with success.
One of my favorite things about this recipe is that if utilizes pears while they are in season and at their peak of nutrient retention and freshness. It is also great that these are designed to be individual pies, so each person gets a whole piece of fruit, and there is no fussing with trying to get that first piece of pie out of the pan! Also everything can be prepped ahead of time. The puff pastry, poached pears, and syrup will all be fine in the refrigerator for a few days before your event, just leaving assembling and baking for the day of!
The puff pastry dough is the most difficult part of this recipe. It is important that puff pastry dough remains cold during the whole process, so it each time if got a little too warm, I had to stop for 30 minutes so that the dough could chill in the refrigerator. It would simplify the process to use frozen puff pastry from the store, however, many store bought puff pastries have added ingredients and preservatives that you would not include if made at home.
*makes 6 pies
Ingredients
For the puff pastry
- 2 ½ cups unbleached all-purpose flour
- 1 ¼ cups cake flour
- ½ tablespoon salt
- 1 ¼ cups very cold water (I chilled with ice and strained immediately before use)
- 1 pound very cold unsalted butter
Preparation:
- Combine flours, and salt into a food processor. If your food processor will not hold all ingredients make the dough in two batches and combine. Pulse the food processor until flours and salt are just combined.
- Add all water into the processor and pulse until a ball of dough forms. The dough should feel moist and when squeezed should hold together.
- Remove the dough and form it into a ball.
- Wrap the dough in a damp towel and refrigerate for at least 5 minutes.
- While dough is chilling, place butter between 2 sheets of plastic wrap. Beat the butter with a rolling pin until it flattens into a square that is about 1 inch thick. The butter needs to remain cold, so if you notice softening or oiliness forming, place in refrigerator or freezer and allow the butter to chill before continuing.
- Unwrap your dough and roll out on a lightly floured surface into a 10-inch square. Place the chilled butter in the center. Fold and stretch the dough to fully encase the butter inside the dough. (Remember it is important for this dough to stay cold. To keep your dough cold you can stop at any point, cover the dough in plastic wrap, and place it in the refrigerator.)
- Roll the dough into a rectangle that is approximately 24 inches long. Fold this rectangle by thirds, like you would fold a letter. Rotate the folded dough to the left so that the closed fold is on your left.
- Repeat the process of rolling out a 24-inch rectangle, folding it in thirds and rotating it. I chilled my dough after this second time for 30 minutes.
- Remove the dough from the refrigerator and roll out 4 more times, chilling when needed.
- Chill pastry dough for at least an hour.
For the poached pears
- 6 large, firm pears (preferably ones that are straight and tall)
- 1 ½ cup sugar
- 18fl oz dry white wine
- 2 cinnamon sticks
- 1 orange zest only
Preparation method
- Peel the pears, keeping the stems intact.
- Combine 14fl oz water, the white wine, cinnamon, orange zest, and sugar, slowly bring to the boil, stirring until the sugar is dissolved. Boil for three minutes.
- Add the pears to the pan. Bring back to the boil, reduce the heat to a simmer and cook for 15 minutes. Reserving the syrup, remove the pears from the pan with a slotted spoon and set aside to cool on kitchen paper. Using a melon baller or small teaspoon remove the core from the pears.
- Return the syrup to the heat and boil rapidly for 10-15 minutes until the volume of the liquid is reduced by half and the syrup is thick. Remove from the heat and set aside to cool.
- Chill the poached pears until cold.
Putting it all together
- Preheat the oven to 400F.
- Using a sharp knife and a ruler cut the pastry into long strips ½ inch wide. You will need about 18-20 strips.
- Brush the pears with the cooled sugar syrup and starting from the bottom, wrap the pastry strips around the pears. When you come to the end of the pastry strip, brush the end lightly with syrup and press to adhere to the next pastry strip. Continue wrapping until you reach the top of the pear. (Three strips should cover each pear). Tuck the end of the last pastry piece behind the previous dough spiral.
- Place the pastry-covered pears on a baking tray. Brush the pastry with beaten egg and sprinkle with the granulated sugar. Bake for 25-30 minutes.
- Remove from the oven and leave to cool for 10-15 minutes then serve with a drizzle of the reduced sugar syrup.
Whether you are enjoying the fruits of your labor on a quiet night at home, or at a fall get-together, these mini pear pies will impress all with their uniqueness, beauty, and mostly their flavor! Dig in!
If you liked this article, try this one too: 50 Ways to Use Pears
Recipe sources
Mini Pear Pies:
http://www.bbc.co.uk/food/recipes/mini_pear_pies_77186
Puff Pastry:
http://www.healthygreenkitchen.com/homemade-puff-pastry.html


Featured Recipes
COTTAGE CHEESE & BLUEBERRY BREAKFAST BAKE
Read More
Warm Your Soul Lasagna Soup
Read More
Pear Lime Jello Salad
Read More