
Blog
Hay Bale Gardens
By Michael Russell, recent Arizona State University Nutrition Communications Student
A raised garden is a wonderful idea, it combines innovation and beauty, but it also requires a lot of work and at times a lot of money. For those of us who are looking to keep cost to a minimum and still be able to create a functional garden, I think I have found the perfect solution: hay bale gardens.
My plan was to write a few articles on the topic of children’s nutrition after I finished my articles on backyard farming and edible gardens until my wife texted me some information on this wonderful idea. I was immediately drawn in and wanted to learn more about this style of gardening. I thought that this was a great way to get some gardening done out here in Arizona as most homes do not have great soil to start with. I did some research on hay bale gardens and here is what I learned:
THE SETUP:
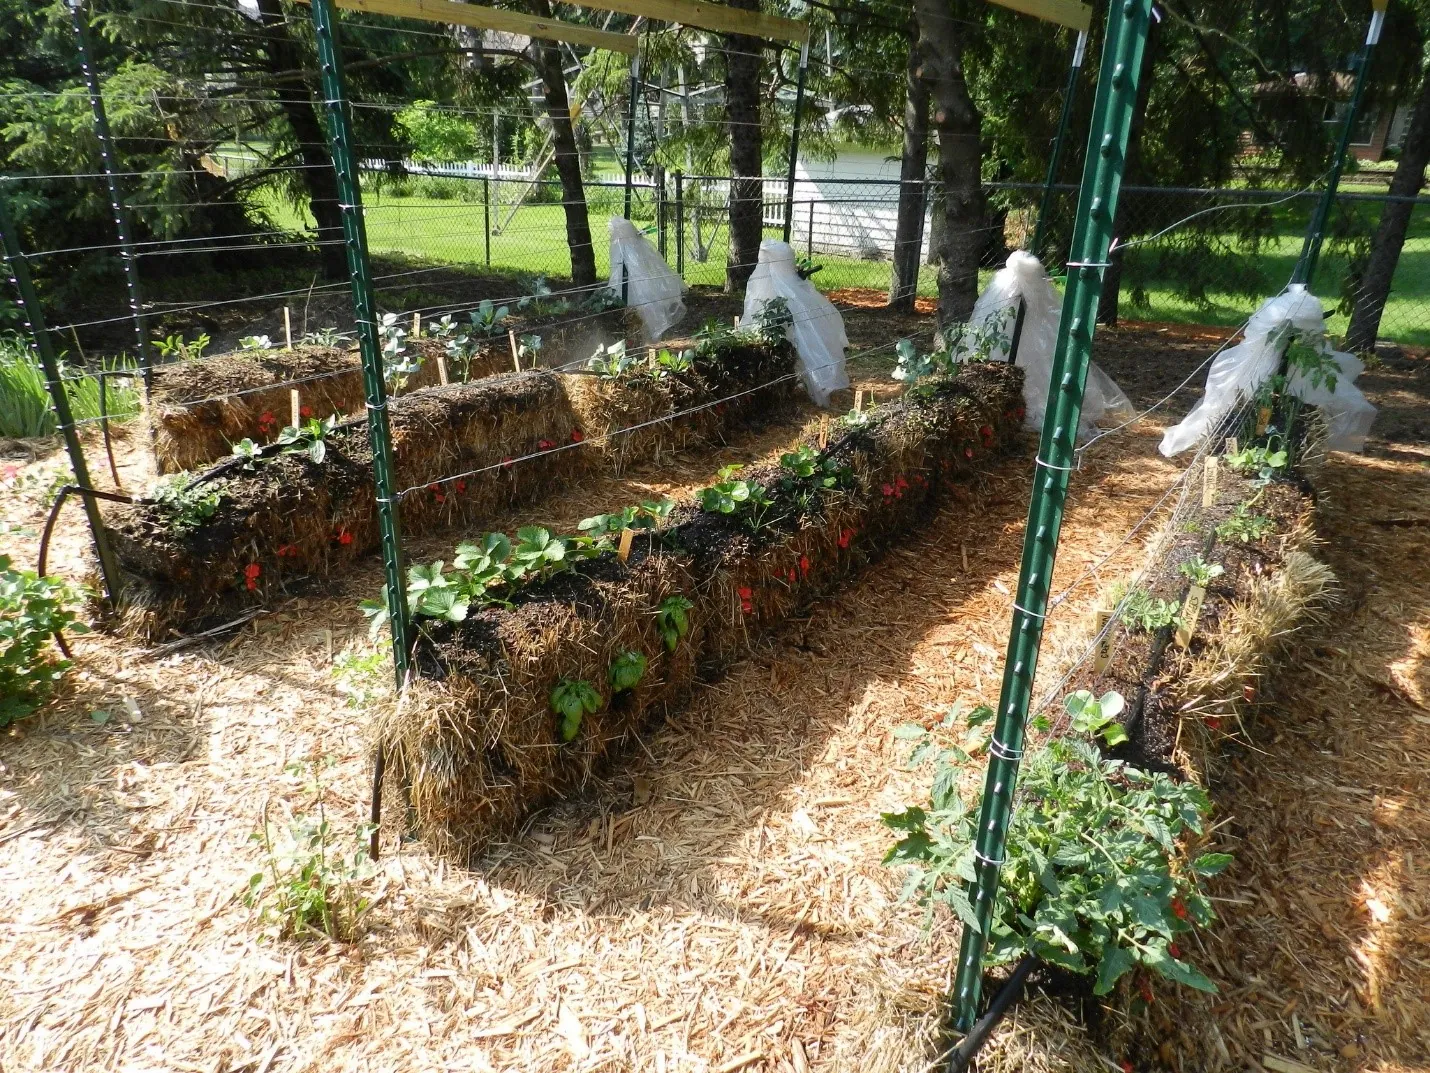
- Choose wisely: When starting your hay bale garden it is best to choose a spot that will get plenty of sunlight, in the valley of sun I do not see that being an issue. Once you start to condition you hay bales they will grow extremely heavy and moving them will be difficult, so it is best to choose your garden layout wisely and stick with it.
- Straw is straw: Not true. Choosing your straw is crucial to creating a strong and productive garden. Instead of running to a garden center it is advised to source your straw directly from the farmer as they will know exactly how the straw was grown.
- Positioning: It is time to start building you garden, not the plants but the containers for them. Prior to positioning the bales of hay lay down landscape fabric as to prevent any weeds from creeping up into the hay. Next, place the hay bale on its side so that the string is running across the sides of the bale. This will put the cut side face up to allow the hollow tube of straw to absorb as much as moisture as possible. Be careful not to sever the string because they will keep the shape of bale intact as it softens.
CONDITION THE HAY BALES
Now the fun begins. You now have your garden setup in the sunniest spot and it is time to plant, not quite. In order to create a functioning hay bale garden, you must condition the bales ten days prior to planting. The following will walk you through the process to do so:
- The first six days: Let’s get the bales of hay cooking. In order to do so put 3 cups of an organic fertilizer on the bales of hay and water them thoroughly every other day. On the off days just water the bales. This will drive the fertilizer down into the hay and start the decomposing process.
- Day seven to nine: You are going to cut the organic fertilizer in half, 1.5 cups, and water thoroughly every day.
- Day ten: On the tenth day pump the organic fertilizer back up to 3 cups and add phosphorus and potassium and water it thoroughly.
At this point, you should be able to stick your finger into a bale of hay and it be moist and hot inside. You should also see black soil-like clumps; this is known as “peppering.” The clumps are a signal that the decomposition process has begun. An extremely positive sign is if you see mushrooms starting to sprout up within the bales of hay. They are not harmful and an indication that the hay is decomposing as scheduled.
TIME TO PLANT (I PROMISE)
Time for your hard work to pay off. Now that you’ve properly positioned and conditioned your hay bale garden it is time to plant.
- The exceptions: There are several types of plants that you can choose to grow but there are some exceptions to that rule. You will want to stay away from tall plants, tomatoes, and corn, as the will become too heavy and start to break the bale apart. If you desire tomatoes, it is best to choose a variety of bush plant. Also stay away from running plants like sweet potatoes, as they will be difficult to grow properly within the bale.
- Preparing the bale for planting: Now that you’ve chosen your plants it is time to cut into the bale. With a trowel create a hole that will be deep enough to accept a rootball, place the plant into the hole and cover with a quality soil mix. After adding the soil mix use some of the straw you removed and water well. If you choose to start your garden from seeds, then sew in one to two inches of quality soil mix and allow the seeds to germinate the hay bale.
- Recycled goodness: So your plants have grown and now the hay bale is a gray soppy mess, what now? Well, here is one huge benefit to hay bale gardens, you can allow the decomposed hay bale compost over the winter and create a nutrient rich environment for next spring’s garden.
TIPS:
- When purchasing the bales look for the tightest bound bales that are bound with synthetic twine. These particular bales are less like to lose their structure throughout the growing process.
- Water your bales twice a day. The bales cannot be over watered as they do not hold onto water the way soil does.
- Hay bales will typically have seeds within them so do not be alarmed at the sight of grass growing within the bale. The grass will not affect the way the plants grow and may be visually interesting.
- Space your plants out the same way you would with a traditional garden.
- You can turn your hay bale garden into a greenhouse by simply adding a few materials to it. At the end of each row add a seven-foot post and run wire in 10-inch intervals from the top of the bales. As the seeds begin to sprout you can wrap plastic tarp from the bottom wire to insult the plants during cooler nights. A second benefit to the wire and post is it will act as a trellis for plants that tend to grow tall.
- In order to utilize the space on the sides of the bales that may typically not be used is you can add annuals and herbs. This will help to create a garden that is more sustaining and visually stunning.
REFERENCE
- 2016. Available at: http://media.pennlive.com/life/photo/balegardenjpg-
5d19ac4cfac9e62e.jpg. Accessed March 4, 2016.
- How to Build a Straw Bale Garden – Modern Farmer. Modern Farmer. Available at:
http://modernfarmer.com/2013/07/straw-bale-gardening/. Accessed March 4, 2016.
- How to Condition and Plant a Straw Bale Garden. Bonnieplantscom. 2016. Available at:
http://bonniplants.com/library/how-to-condition-and-plant-a-straw-bale/. Accessed March 4, 2016.
- University C. Hay Bale – Factsheet – Greenthumbs, Healthy Joints – Center for Excellence in
Disabilities. Greenthumbscedwvuorg. 2016. Available at: http://greenthumbs.cedwvu.org/factssheets/hay-bale.php. Accessed March 4, 2016.


Featured Recipes

COTTAGE CHEESE & BLUEBERRY BREAKFAST BAKE
Read More


Warm Your Soul Lasagna Soup
Read More
Pear Lime Jello Salad
Read More