Blog
How to Compost
Whether you are at the local farmer’s market or in the produce section of the grocery store, if you are like us, you take advantage of the abundant selection of fresh Arizona grown fruits and vegetables available all year round. Like us, you plan your groceries carefully and buy only what you need. But life happens to all of us and those succulent strawberries may go bad before we use them. Rather than throwing them away, put them to good use alongside your potato peels and grass clippings and start your own compost pile.
Benefits
As long as there have been farms and gardens, farmers and gardeners have harnessed the power of nature to produce nutrient dense, soil enriching compost. This practice is very beneficial for you and for the community as a whole. With a basic understanding of composting, you can turn your kitchen waste and yard trimmings into a natural soil supplement without expending anything more than a little time and effort.
Composting on any scale is beneficial because it reintroduces valuable nutrients back into the soil and better soil requires less fertilizer to support the growth of vegetables or ornamental plantings. From a community perspective, recycling organic household waste through a composting program benefits everyone over the long term. Compostable material that ends up in our landfills is essentially a wasted resource. It cannot be repurposed because it is mixed with non-organic and even hazardous materials while breaking down. According to the University of Arizona’s Cooperative Extension website, an estimated 20-40% of all waste that ends up in our landfills could be composted. Imagine the positive impact if everyone built a compost pile in their yard.
How it Works
Decomposition, the breakdown of organic materials like dead leaves and potato peels, is nature’s way of recycling waste, reducing it to a nutrient rich material called humus and reintroducing those nutrients back into the soil to enhance future growth. Composting takes this process and super charges it by creating the most advantageous environment for it to occur. A successful composting program has four required elements – organic material, microorganisms, moisture and heat – which create an environment that promotes decomposition. The recommended structure for a compost pile ensures these elements are present in the appropriate amounts and working together to produce the best possible results.
Building Your Compost Pile
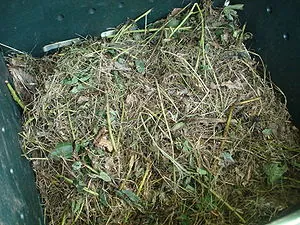
The key to a successful compost program is creating and maintaining an environment that allows the microorganisms to thrive. In terms of size, a compost pile with a three foot square footprint produces the right amount of heat and therefore is a good starting point. Stake out your composting area and lay down a base layer of twigs and other plant material that is about three inches thick. You want these materials to be coarse and stiff to ensure proper airflow and drainage at the bottom of the pile.
Next, add a layer of kitchen scraps and other organic refuse. This is the first carbon layer of your pile. When deciding what kitchen scraps to add, it is a good general rule to avoid anything that came from an animal as these will attract unwanted insects and animals. The only exception to that rule is crushed eggshells, which are a welcome addition to the compost pile.
Your second later should be grass clippings, manure or hay and will be the first nitrogen layer. The ratio of carbon to nitrogen in your pile is the most critical factor to the success of your composting efforts. You want a 20 to 1 ratio, carbon to nitrogen. With that ratio in mind, continue to add layers atop one another alternating high carbon materials and high nitrogen materials.
As you are adding layers, you may need to add a thin sprinkling of soil to ensure there are enough microorganisms present throughout the pile. If the organic material you are using does not include manure or sources for soil like plant roots, you need to take this additional step.
You are looking for a pile of between three and five feet in height for maximum heat production. Most experts agree that compost starter products or additives are not necessary as long as you follow the guidelines for proper set-up. But don’t fret about getting everything perfect on the first try; if the ratio is wrong or the airflow is inadequate, there are simple measures you can take to fix the problems without wasting your initial efforts.
Maintenance
The keys to maintaining your compost pile are airflow, moisture and heat production. Turning your compost pile regularly keeps the materials from becoming compacted and ensures adequate airflow. How often your turn the pile is largely dependent on how quickly you want usable compost. The general rule of thumb is to turn the pile about a month after it is first constructed and then about every 6 weeks. However, you can turn it more frequently to speed up the process or to address an imbalance.
Monitoring the moisture level of your pile on a regular basis helps ensure it is moist enough to sustain the microorganisms. Water needs to be added to the pile on a regular basis, especially in drier climates like ours. To gauge the moisture level, grab a handful of material from the pile. It should not release any water while being held in your hand, but if squeezed, it should release drops of water. If it is too dry, add water. If is it too wet, turn the pile and add additional coarse material.
If properly constructed, your compost pile should heat up rapidly and gain an internal temperature of around 160°F within the first few days. Heat is essential to the decomposition process but it also ensures the pile isn’t growing weeds or unhealthy microorganisms. For both these reasons, it is very important to maintain the temperature with the proper mix of carbon to nitrogen materials and sufficient moisture.
The Finished Product
Finished compost has a rich earthy smell, a dark brown color and an almost fluffy texture. For most piles, usable compost can be produced in four to five months although it can take up to a year. In very dry climates like ours, the process tends to take longer. If you want faster results, speed up the process by shredding materials before adding them to the pile, keeping a watchful eye on the moisture level and turning the pile once a week.
Now that you have finished compost, you have many options for how to use it. If you have a garden, till your finished compost into the soil prior to planting. Compost can also be used to supplement the soil in your landscape features or container garden. If you don’t have a use for it on your own land, you can donate it to a local farm, greenhouse or community garden.
Whether you need a small amount to enrich your decorative plantings, enough to grow a vegetable garden fit for a king or simply want to limit your contribution to the local landfill, the benefits of composting your organic materials far outweigh the time and effort required to do so.
Related articles
- Why do you need to turn over your compost pile? (greenanswers.com)
- Arizona Farm Bureau: Farmer’s Markets
- Find an Arizona Farm
- How to Compost: Hot and Cold Methods (dmacc50222.wordpress.com)
- Composting 101: An Eco-Friendly Option for Organic Waste (everydayhealth.com)


